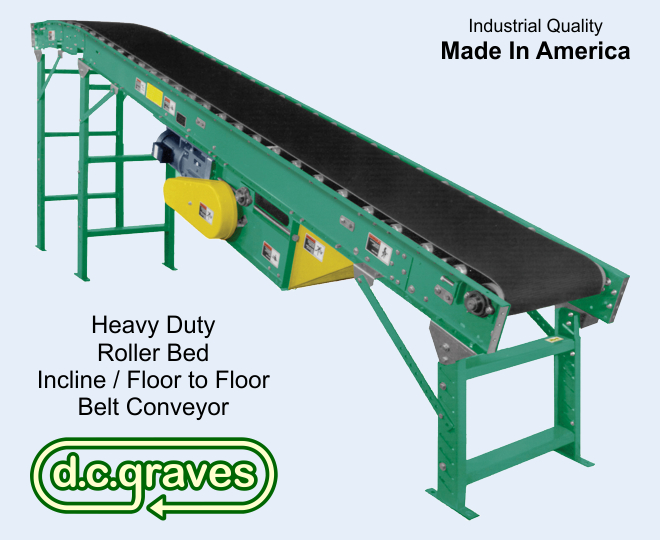
"Quick-Ship" - Series #HRF
Heavy Duty - Roller Bed
Floor to Floor / Incline
Belt Conveyor |
| Pricing - Series #HRF |
| Pricing - 12" Wide Belt / 18" Wide Frame |
Pricing - 30" Wide Belt / 36" Wide Frame |
| Pricing - 18" Wide Belt / 24" Wide Frame |
Pricing - Options |
| Pricing - 24" Wide Belt / 30" Wide Frame |
|
|
|
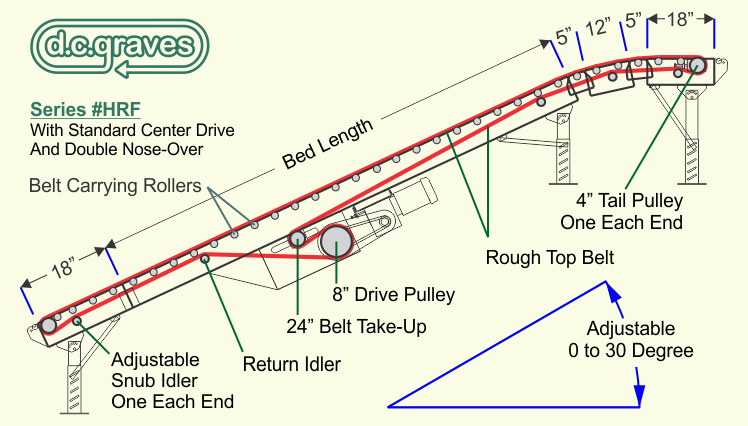
| Specifications - Series #HRF |
Belt: Rough-Top belt.
Bed: 12 gauge powder painted formed steel channel 7" deep with 1.9" diameter x 16 gauge galvanized steel rollers on 6" centers. Bed sections are bolted together with butt couplings.
Under-Trussed Bed: Bed sections 20' or longer equipped with under-trussed reinforcement to prevent sag.
Double Nose Over: Two adjustable bed sections provide a two step transition from incline to horizontal.
X-Bracing: Frame squaring device supplied with conveyors over 40' long on every other bed section.
Tail Pulley: 4" diameter crowned with 1-3/16" shaft for belt widths to 30", 6" diameter crowned with 1-7/16" shaft turned down at ends for 36" wide belt.
Drive Pully: 8" diameter drive pulley crowned and lagged with 1-7/16" diameter shaft.
Snub Rollers: 2-1/2" diameter at drive pulley, 2" diameter at tail pulley.
|
Center Drive: Mounted below conveyor bed section.
Return Idlers: 1.9" diameter.
Pop-Out Roller: Free floating, 1-3/8" diameter rollers located at tail pulleys with gravity connector rods. Will lift out if anything is caught between roller and tail pulley.
Floor Supports: Adjustable supports from 31-1/2" to 45-1/2", measured from floor to top of belt, knee braces included.
Take-Up: Located in center drive assembly, provides 24" of belt take-up.
Bearings: Sealed and prelubricated with cast iron housing.
Motor: 3/4 HP 230-460-3-60 totally enclosed.
Belt Speed: 60 feet per minute, constant speed.
Finish: Green Powder Coat Finish.
|
| Load Capacity Chart (60 FPM) |
| Maximum load per lineal foot of conveyor is 75-lbs. Not to exceed load capacity chart. |
| Motor HP |
Maximum Total Load |
| 1/2 HP Motor |
435-lbs |
| 3/4 HP Motor |
650-lbs |
| 1 HP Motor |
810-lbs |
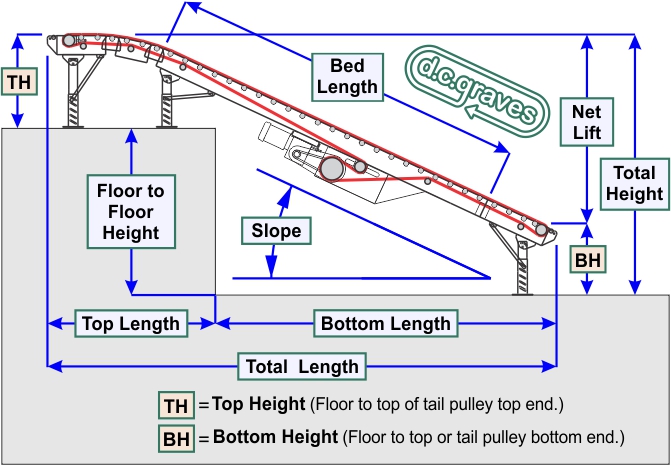
| #HRF- Floor to Floor/Incline Conveyor - Basics |
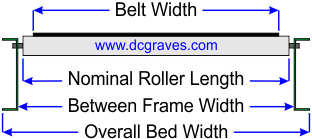
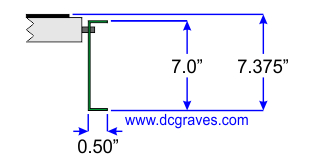
| Important Dimensions |
 |
 |
 |
Floor To Mezzanine Application
|
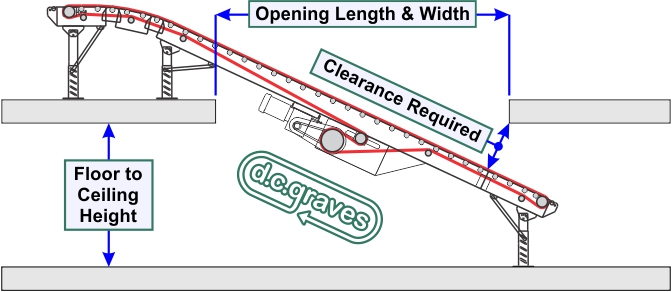
Through The Floor Application
(For through the floor applications add these important dimensions to those above.)
|
| Where to Begin? |
When considering a floor to floor/incline roller bed belt conveyor, the most often asked question is, "Where do I begin?".
Well here we go.
1) Gather information on all products that will travel on the conveyor.
2) Determine your Conveyor Slope.
3) Determine your Net Lift.
4) Determine your Bed length and Total Length.
5) Determine the allocation of Total Length between Top Length and Bottom Length.
6) Determine your belt and frame width.
7) Determine your capacity requirements.
|
| 1) Gather Information |
Gathering the correct information on all products that will travel on your proposed floor to floor/incline roller bed belt conveyor is crucial to a successful design. The following is a list of the information that needs to be gathered in this step.
a) Box Width
b) Box Length
c) Box Height
d) Box Weight
e) Balanced or Unbalanced Load
f) Figure "Box Ratio" (box length divided by box height)
g) Figure Box "Weight Per Foot" ({box length divided by 12} times box weight)
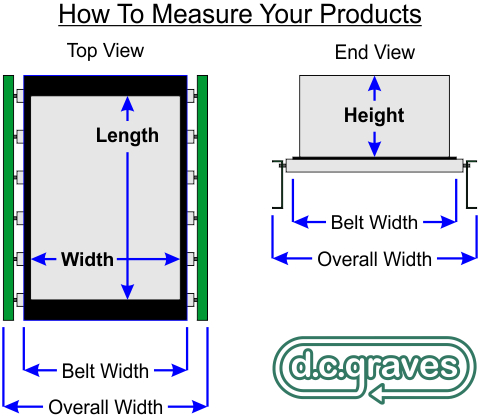
Pre-Designed PDF Information Sheet |
How you place a box on the floor to floor/incline roller bed belt conveyor determines how the box is to be measured. Use the drawing above for guidance and measure all boxes accordingly. |
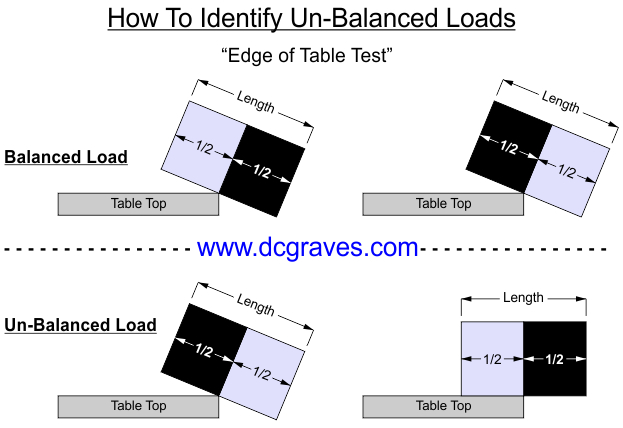
In this step boxes with unbalanced loads must be identified. A simple test that can be performed on your boxes is the “Edge of Table Test”.
On any level table, cabinet, workbench etc. extend exactly ½ of the box length off the edge of your table, then rotate the box 180 degrees (without lifting the box) and extend the other end of the box, exactly ½ of the box length, off the edge.
If the box wants to tip from both ends of the box, it is balanced.
If one side wants to tip and the other side does not tip than the box is unbalanced.
Identify all unbalanced boxes and set them aside for further testing. |
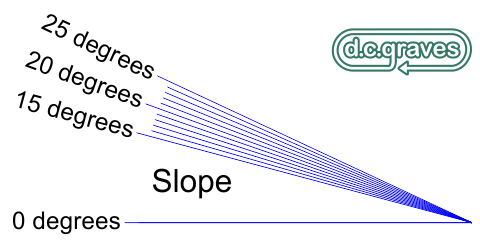
| 2) Determine Conveyor Slope |
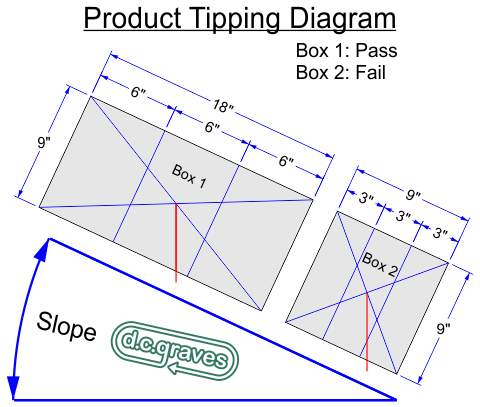
When determining your working heavy duty conveyor slope you want to find the highest slope you can use that works with all your products traveling on your floor to floor/incline roller bed belt conveyor. This is usually determined by the "Box Tipping Diagram" shown bellow. This method is accurate but cumbersome, with this method you have to create a drawing to get your answers.
We have come up with the "Box Ratio" method. The method is mathematically linked to the "Box Tipping Diagram".
|
The "Product Tipping Diagram" can be used to check if a box will tip based on the conveyor slope.
1) Divide the box length into thirds, draw lines.
2) Draw lines from diagonal corner to diagonal corner, creating center point.
3) Rotate the box drawing to the desired slope.
4) Draw a line from the center of the box straight down. If this line stays in the center third of the box as it passes thru the bottom this box will work with this slope. If the line falls outside of the center third of the box it will tip.
(In the above case the conveyor slope would have to be lowered to accommodate "Box 2".)
Note: This method only works for boxes that have a evenly balanced load. For boxes with unbalanced loads further consideration is required. |
| "Box Ratio" Method
This is another method to check for box tipping that uses the ratio between the box length and the box height. This method is based on the above "Box Tipping Diagram" but does not involve any drawing.
1) Divide the length of the box by the height of the box, this will give you the “Box Ratio”.
2) Check the Chart below, find the highest “Box Ratio” that is lower than your box's “Box Ratio” and your box will work with that slope or any slope that is less.
3) When dealing with multiple boxes the box with the lowest "Box Ratio" will be used to determine the slope of your floor to floor/incline belt conveyor. |
| "Box Ratio" Chart |
| Slope |
"Box Ratio" |
Slope |
"Box Ratio" |
| 30 Degree |
1.7320 |
19 Degree |
1.0329 |
| 29 Degree |
1.6629 |
18 Degree |
.97475 |
| 28 Degree |
1.5951 |
17 Degree |
0.9172 |
| 27 Degree |
1.5285 |
16 Degree |
0.8602 |
| 26 Degree |
1.4632 |
15 Degree |
0.8038 |
| 25 Degree |
1.3989 |
14 Degree |
0.7479 |
| 24 Degree |
1.3356 |
13 Degree |
0.6926 |
| 23 Degree |
1.2734 |
12 Degree |
0.6376 |
| 22 Degree |
1.2120 |
11 Degree |
0.5831 |
| 21 Degree |
1.1516 |
10 Degree |
0.5289 |
| 20 Degree |
1.0919 |
9 Degree |
0.4751 |
In the "Box Tipping Diagram" from above there were two boxes.
Box 1: 18" long x 9" high
Box 2: 9" long x 9" high
Using the "Box Ratio" Method (box length divided by box height)
Box 1 has a "Box Ratio" of 2.000 (18" divided by 9")
Box 2 has a "Box Ratio" of 1.000 (9" divided by 9")
Using the "Box Ratio" 1.000 which is the lower of the two "Box Ratios". We find from the above "Box Ratio" chart that a 18 degree slope is indicated.
If these two boxes were the only boxes to travel on your floor to floor/incline heavy duty conveyor than your conveyor slope would be 18 degrees or less. |
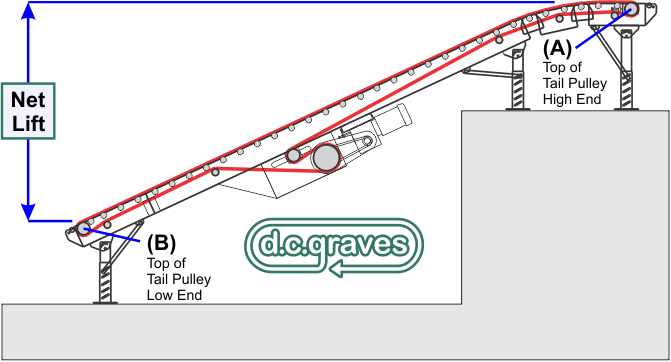
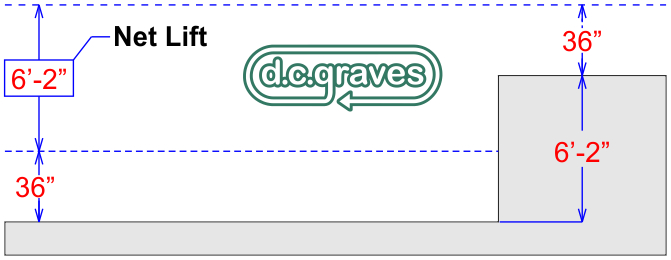
| 3) Determine Net Lift |
The net lift is the difference between (A) & (B):
(A) Top Height
(B) Bottom Height
|
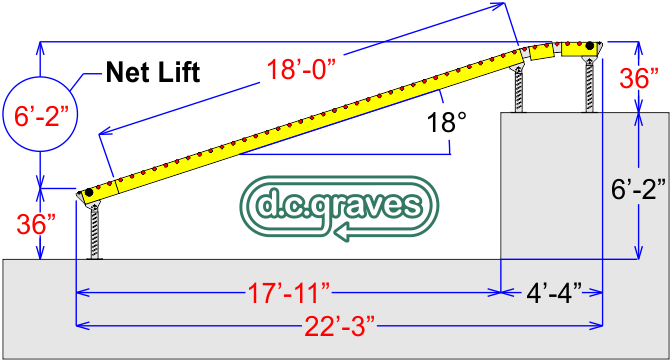
In this example (print below) we have two floor levels that have a 6'-2" height differential. If we want to load and/or unload our boxes at the height of 36" on both floors then the conveyor net lift would be 6'2".
|
| 5) Determine the allocation of Total Length between Top Length and Bottom Length |
In this step we find whether the floor to floor/incline heavy duty conveyor designed in steps (1) thru (4) will fit within your physical layout. Often in this step creative out of the box thinking is required. Continuing with the example from above lets say the Top Length has to be 4'-4" lets add this to the print.
|
Now lets say that after careful consideration we realized that the Bottom Length of 17'-11' is to long. The physical layout of the area where this floor to floor/incline conveyor is to be installed will allow only 14'-6" or less of Bottom Length. As designed this will not work.
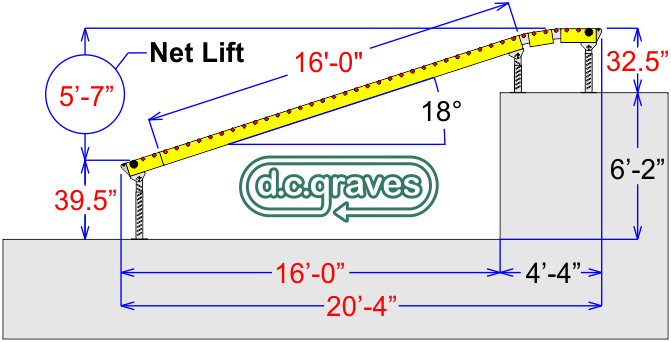
In this example the factors that are set in stone (fixed can not change) are the 18 degree slope the 6'-2" floor to floor height differential and the 4'-4" top length. Keeping these three factors the same we can reduce the Bottom Length by altering the Top and Bottom Heights which in turn alters the Net lift.
Going back up to the Bed Length Chart we see that a 16' Bed Length with an 18 degree slope will give us a 5'-7" Net Lift (6'-2" minus 5'-7" = 7"). If we add 3-1/2" (one half of the seven inches) to the Bottom Height and subtract 3-1/2" from the Top Height we have reduced the Net Lift from 6'-2" to 5'-7" and can use a 16' Bed Length instead of a 18' Bed Length.
|
From the print above we see that switching to a 16' Bed length was not enough the Bottom Length is still to long.
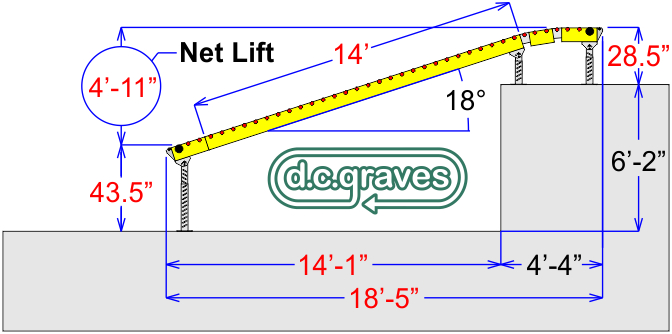
Going back up to the Bed Length Chart we see that a 14' Bed Length with an 18 degree slope will give us a 4'-11" Net Lift (5'-7" minus 4'-11" = 8"). If we add 4" (one half of the eight inches) to the Bottom Height and subtract 4" from the Top Height we have reduced the Net Lift from 5'-7" to 4'-11" and can use a 14' Bed Length instead of a 16' Bed Length. From the print below we see that switching from a 16' bed length down to a 14' bed length creates a 14'-1" Bottom Length. If you could work with these Top and Bottom Heights this layout would work.
It is in this step where creative thinking is imperative. Other situations may have different factors set in stone the floor to floor height differential may be variable and the Top and Bottom Heights may be fixed. Etc. Etc. Etc. |
| Important - "Quick-Ship" - Notes" |
"Quick-Ship" power conveyor orders ship in 5 working days after the order is entered.
"Quick-Ship" orders are quantity sensitive large orders may not qualify" please call to check if you have a large requirement.
All power conveyor products are sold as standard less electrical controls. Electrical controls are available as options.
Electical controls must be mounted and wired by others.
|
|
|
|